Using IMGIX to Personalize Knolled Images
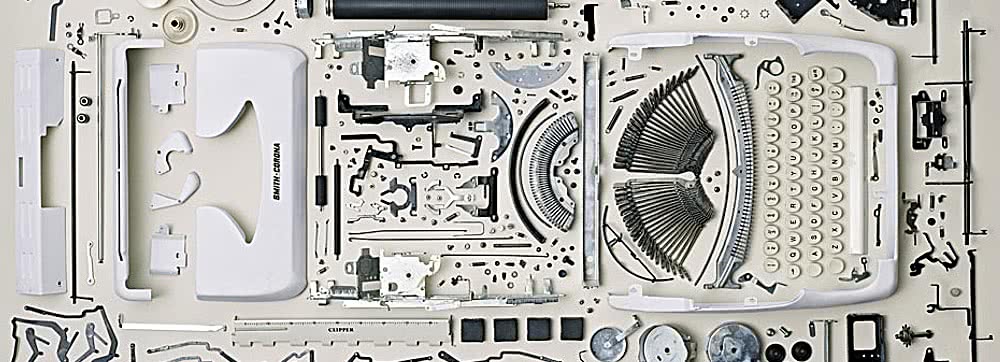
Knolling is the process of arranging different objects so that they are at 90 degree angles from each other. The term originates from a janitor named Andrew Kromelow in 1987 who would arrange tools using this method for a popular furniture brand called Knoll. Commonly photographed from above, knolling is a highly popular method for promoting products from companies like Instagram to Apple.
 Even here at Custom Ink, we use knolling to showcase our products. But how could we personalize knolled images to help our customers visualize their creations? We often use IMGIX to help us process & optimize catalog images and decided to give its blending capabilities a try out. Let's jump right in and explore how.
Our Goal
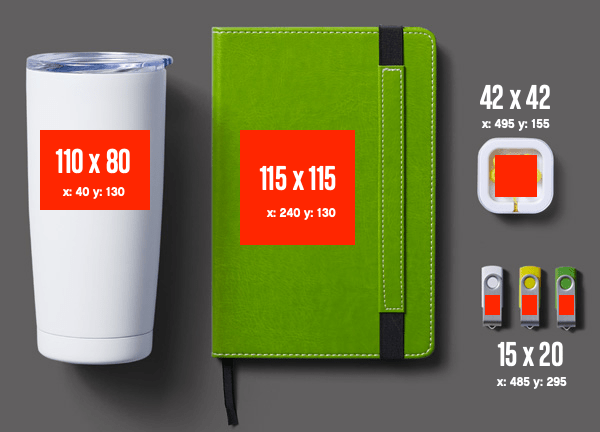
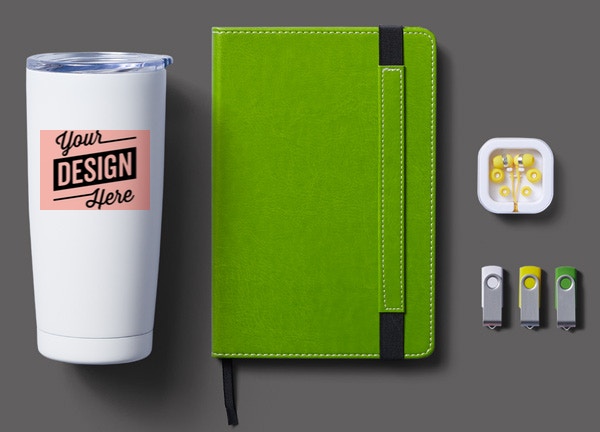
To personalize this image below with a design centered on each product. The image is marked up to indicate areas a design can be placed within, appearing as red rectangles. The width and height of each rectangle appear as large text followed by smaller text indicating the x and y placement coordinates, both in pixels. The overall dimensions of the image is 600x432 pixels. Take note, we will need all these numbers later :)
IMGIX Intro
That background image is hosted on Custom Ink's site at /email/imgix/knolled.jpg and in order for IMGIX to process it, we must allow their system to connect to our site. For today's demo, we are using IMGIX's web bucket source which enables any file in this URL path to be processed.
Below is a little Ruby script that we will use in future code examples. It will evolve a bit as we move forward and the final version can be found in this GitHub gist. The script uses Bundler's inline feature to install our dependencies, for now, the IMGIX ruby client. The design to add is a URL string. Lastly, this script also creates a simple client instance and convenience method to make IMGIX paths to our web bucket source created above.
require 'bundler/inline'

gemfile true do
  source 'https://rubygems.org'
  gem 'imgix'
end

DESIGN_URL = 'https://www.customink.com/email/imgix/inky.png'
IMGIX_CLIENT = Imgix::Client.new host: ENV['IMGIX_SOURCE']

def ixpath(filename)
  IMGIX_CLIENT.path "/email/imgix/#{filename}"
end
First Placement
IMGIX has a vast API available to process images. Think of them as a hosted ImageMagick service. From file formation conversions to face detection, they do it all. But today we are going to make heavy use of their Blending API.
Our first experiment will simply blend our design url onto the base knolled image using dimensions & coordinates from our first design area shown above. The client's to_url methods returns a URL string. The parameters direct IMGIX how to process the image which are mostly self-documenting. If you have questions, reference that API links above as we move along.
ixpath('knolled.jpg').to_url(
  blend64: DESIGN_URL,
  bw: 110, bh: 80,  # Design area width & height.
  bx: 40,  by: 130, # Design area coordinates.
  bm: 'normal'
)
Well this is mostly what we want. The design fits into its area but is not centered. We could adjust the bx param to nudge it to the right, but this requires that we calculate the width of the image. Our goal is to do as little work as possible while making any design (horizontal or vertical) automatically center within each area.
Option #1 - The Blend Align param which adjusts the alignment of the overlay image relative to the base image. So we might think adding ba: 'middle,center' would work? But it does not because alignment only applies when we are not setting the (bx) and/or (by) params.
Option #2 - The Blend Fit param which controls how an overlay image fits within its blend width (bw) and blend height (bh) dimensions. This sounds ideal. But we are already seeing how the default of bf: 'clip' is working by making sure the design proportionally fits in the area. In this case, it adjusted the height automatically for us to 80 pixels. The blend fit param does nothing for alignment.
In order to continue with other design areas, we need to rethink the problem.
New Placement Approach
So did it feel like we hit a roadblock above? We actually learned a valuable lesson. In order to center any design within its area, we need to rethink what is the overlay image. Rather than use the design on its own, we need to instruct IMGIX to make a design area layer which centers the design, then blend that over the knolled background.
To create this layer, we will use a 1px transparent png and resize it to the dimensions of the design layer, then blend the design over it.
ixpath('1px.png').to_url(
  fit: 'crop',
  w: 110, h: 80,
  blend64: DESIGN_URL,
  bw: 110, bh: 80,
  bm: 'normal'
)
 Perfect! The design is centered in a new image that is the exact size of the design area. We had to use a new param, Fit Crop, which maintains the full design area dimensions. If not used, the default fit (clip) would have trimmed our image to
 80x80 pixels.
 DEBUGGING - Sometimes you want to visualize the design area. This is easy to do now by using a 1px image that has a color transparency. I chose red and named it
 1px-debug.png. Here is the same image using the debug pixel.
Finally, putting this new design layer technique onto the knolled background by swapping out the design URL with our new IMGIX layer URL. For this example, I have used the debug pixel so we can see how this all works.
ixpath('knolled.jpg').to_url(
  blend64: ixpath('1px-debug.png').to_url(
    w: 110, h: 80,
    fit: 'crop',
    blend64: DESIGN_URL,
    bw: 110, bh: 80,
    bm: 'normal',
    bf: 'clip',
  ),
  bx: 40, by: 130,
  bm: 'normal'
)
Now we are cooking! But a handful of design areas remain and there is no way to use multiple blends on the same knolled background image. I wonder if we can recursively blend multiple design layers? 🤔
Peeling Back The Layers
We have already seen how we can pass one blended IMGIX URL to another blended IMGIX URL. Till now, that second image's dimensions are the size of the design area - the red boxes illustrated in our goals section. But to layer multiple designs, we need a uniform approach similar to cell animation.
A small change to our Ruby script is needed so the width and height of the knolled background can be used. Also, a clean way to turn on the 1px debug image by setting an environment variable.
WIDTH  = 600
HEIGHT = 432
ONEPX  = ENV['DEBUGPX'] ? '1px-debug.png' : '1px.png'
And now an example of a transparent layer, the size of our knolled background, that has the design area layer blended onto it. The debug pixel was used so we can visibly see these layers at work. Again, here is the Blending API in case you would like to reference these parameters.
ixpath(ONEPX).to_url(
  w: WIDTH, h: HEIGHT,
  fit: 'crop',
  blend64: ixpath(ONEPX).to_url(
    w: 110, h: 80,
    fit: 'crop',
    blend64: DESIGN_URL,
    bw: 110, bh: 80,
    bm: 'normal',
    bf: 'clip',
  ),
  bx: 40, by: 130,
  bm: 'normal'
)

Stacking The Deck
We need to create a Ruby DSL that allows us to stack IMGIX design layer URLs like the one above. The pseudo code I initially wrote looked something like this. Where Ruby blocks allow us to recursively build a stack.
knolled_background(name) do
  design_layer(bw, bh, bx, by) do
    design_layer(bw, bh, bx, by) do
      # ...
    end
  end
end
But if every IMGIX URL uses the (blend) option, where is our recursive hook to stitch each layer together? The answer is the Watermark API which has a similar interface to blending. So here is our final addition to our Ruby script.
def design_layer(bw:, bh:, bx:, by:)
  ixpath('1px.png').to_url({
    w: WIDTH, h: HEIGHT,
    fit: 'crop',
    blend64: ixpath(ONEPX).to_url({
      w: bw, h: bh,
      fit: 'crop',
      blend64: DESIGN_URL,
      bw: bw, bh: bh,
      bm: 'normal',
      bf: 'clip'
    }),
    bx: bx, by: by,
    bm: 'normal',
    mark64: block_given? ? yield : nil,
    markx: 0, marky: 0
  })
end
Because the inner most image, the first URL generated has no block argument, we use Ruby's block_given? to conditionally yield or not. And because we have uniform layers, all we have to do is set both (markx) and (marky) to 0. Perfect!
Putting It All Together
All that learning so we can write this concise code using each design area's data.
ixpath('knolled.jpg').to_url({
  blend64: design_layer(bw: 110, bh: 80, bx: 40, by: 130) {
    design_layer(bw: 115, bh: 115, bx: 240, by: 130) {
      design_layer(bw: 42, bh: 42, bx: 495, by: 155) {
        design_layer(bw: 15, bh: 20, bx: 485, by: 295)
      }
    }
  },
  bm: 'normal'
})
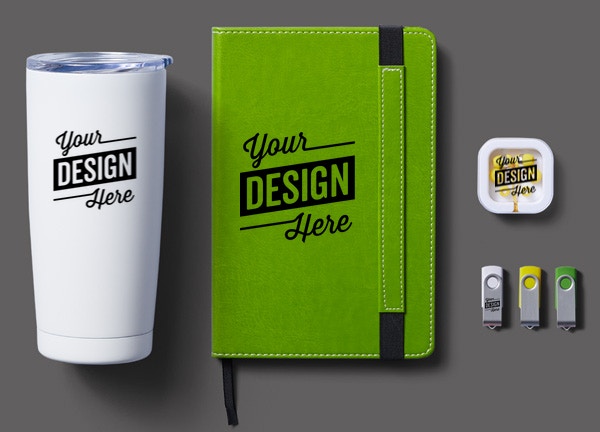
From here you can do all sorts of additional fun things. For example, you can create layers in PhotoShop and interleave as you build your design layers. You can even use URL shortener services like Bitly as you build IMGIX URLs to ensure your final URL remains well under browser limits. Here is an example of how we are using all these techniques.
Thanks!
If you have any questions or comments, please feel free to ask or share. Thank you so much for reading and remember - Always Be Knolling (ABK) !!!